TEAM K.A.M
Tuesday, 9 November 2021
Friday, 8 October 2021
Thursday, 23 September 2021
Thursday, 15 December 2016
Key Glossary
Glossary
- Atomization
- The breaking up of finish particles through the tip of an air gun under pressure. A fine mist is created that lands on the surface and levels out to a smooth finish.
- Binder
- Finish or resin added to the stain, used to lock the pigment and dyes into the wood.
- Blush
- Cloudy haze in finish caused by moisture trapped beneath the surface. High humidity is the most common cause. Can be also caused by the improper application of an oil base stain under a water base finish.
- Coalescing
- The evaporation of the chemicals that keep the acrylic resin in a liquid form. Once this process is complete, the acrylic forms a hard finish film.
- Crazing
- Tiny cracks in the finish film, usually along the edges of a surface. Caused by the finish drying too fast in high temperatures.
- Extender or Retarder
- Chemical additive used to control the drying and flow of finishes. Can be used with stains and finishes to "extend" the open time.
- Fish Eyes
- Defects in the finish film caused by surface contamination (usually from oils, silicones, and waxes.)
- Gloss
- The amount of light reflected off the finish surface. High gloss is rated 80-90°. Semi gloss is rated 50-75° . Satin is rated 30-45°. Rubbed effect is rated 20-25°. Flat sheen is rated 5-15°.
- Grain Raising
- Tiny fibers in the wood grain that lift when exposed to water. Easily controlled with proper sanding.
- HVLP (High Volume Low Pressure)
- An HVLP spray unit consists of a turbine motor that produces warm, low-pressure air. Its high transfer efficiency increases the square foot coverage.
- *HPLV = conventional
- Orange Peel
- Defect in finish film usually caused by cool drying temperatures or improper fluid tip size. The finish looks like the surface of an orange.
- Resin
- The material that forms a hard film on the surface after the chemicals have evaporated. Acrylics and urethanes are the common resins used in water base finishes.
- Satin
- Finish that has had the gloss reduced to provide a softer sheen. A flattening agent made from fumed silica reduces the amount of light reflected by the surface.
- Stain
- A liquid mixture to color, which characteristically sits on the surface of wood. Made of 4 parts: Vehicle (water or solvent), Colorant (pigments and dyes), Binder (resin), Additives (solvents to control drying). *Dyes are penetrating and generally 2 parts, Pigment and Solvent
- Viscosity
- The thickness of a fluid. This is used to determine flow rates for spray application. Usually measured with a #2 Zahn cup or #4 Ford cup. Viscosity can be decreased by using the appropriate thinner.
Tuesday, 24 May 2016
Friday, 8 January 2016
STIR IT, AND STIR IT SLOWLY
Here is a mixture that has been sitting still for over a day.
As you can see, The 80/20 mix of thinner and pigment has separated. If it was salad dressing, I would shake the container to mix it back up. But since (for obvious reasons) this is not going to end up in my belly, that it not an option.
The reason finishers do not shake containers to mix them, is because this creates air bubbles in the product.
Here in the bottom of this pail of lacquer, we can see the silicate has deposited at the bottom.
IF the lacquer is not properly mixed, and there is not enough silicate present, it will appear too glossy.
STIR the product every day. Slowly to not create bubbles.
Tuesday, 5 January 2016
Keep track of your things!
Make sure to keep your things with you at your bench, and try not to forget them in the spray booth. I left my story board there for maybe ten minutes and it got lacquer dripped onto it! I'm just glad it was my story board and not a proper project. Don't let it happen to you!
"Student Zones" are susceptible to splashing Solvents and other products. Even after lessons and policy enforcement, the hustle and bustle of School is sometimes a recipe for disaster. When this happens in the workplace, heads usually roll.
Friday, 18 December 2015
After Use, Seal the Can!!!!!!!!!!
When Oxygen makes contact with our finishing products, they begin to dry.
If a can is not closed properly, the product inside will start to create a film on top. It also affects the product underneath the film and more than often renders the rest of the product useless.
Material that builds up on the rim will prevent the can from sealing properly and air will get in.
Maintaining a clean rim is part of a finishers job.
Cleanliness and organized habits are necessary for maintaining finishing product and accessories.
Organization, Clean work habits and Frugality are competency's to be developed here in school
The Video Below demonstrates how to properly close a can.
- Clean the rim often
- use a rag to avoid splatter
- Only a hammer is good enough to tap down and seal the can
- Tap down the rim ONLY
- clean away any excess drips before storage
Wednesday, 16 December 2015
Check your joinery for glue spots
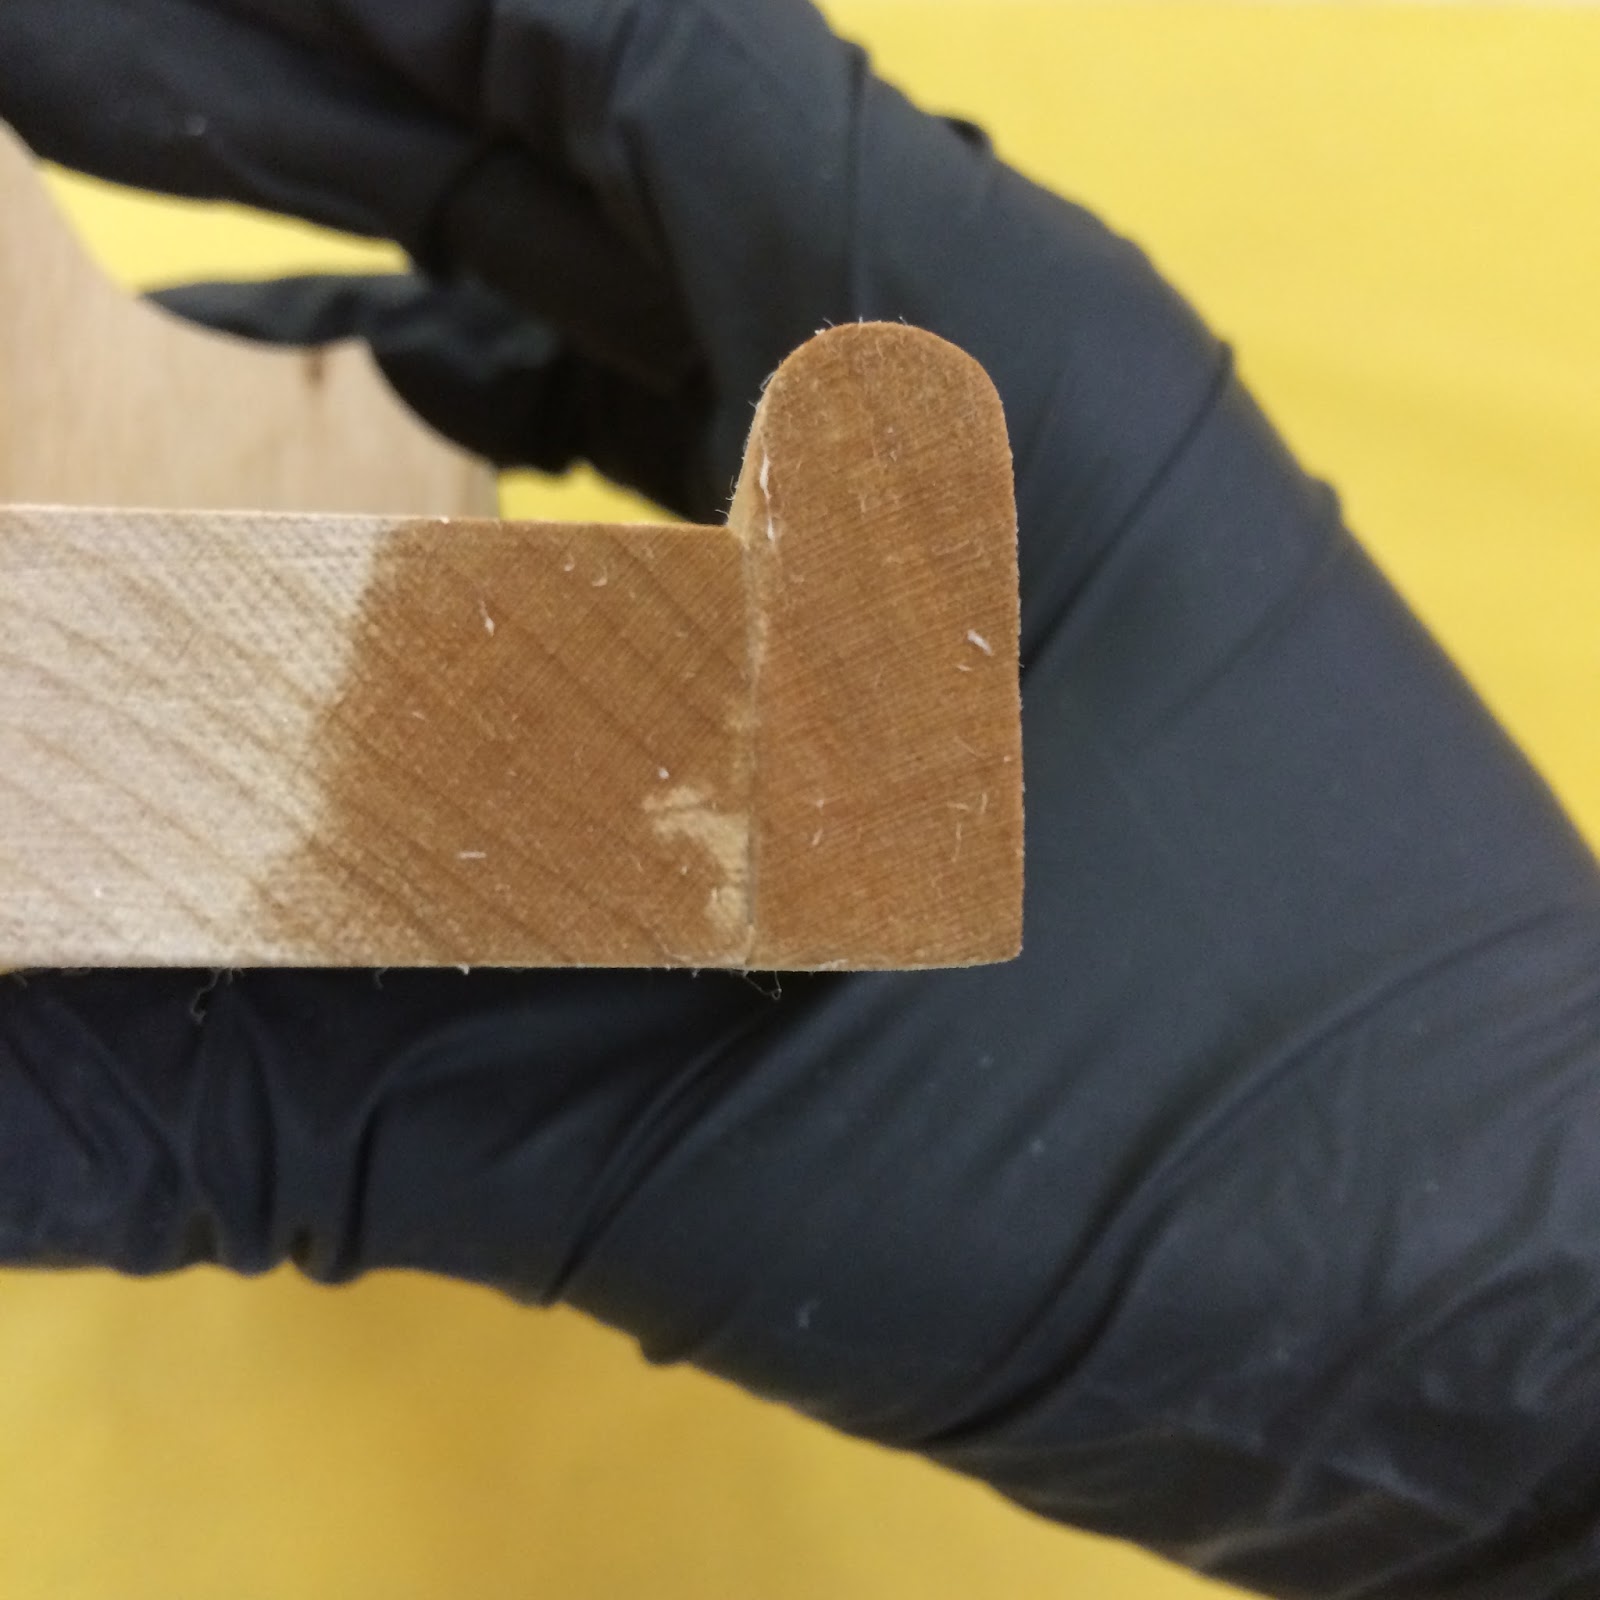
When it's time to begin sanding a project that you intend to finish, make sure to check your joinery before starting to sand! Some lacquer thinner rubbed onto your piece with a cloth will soak in, but not where there's glue, like on that small light spot toward the bottom of the joint in the picture. You can scrape the glue away with your cabinet scraper or a chisel, and then check it again with lacquer thinner to be sure it's all gone. You're saving yourself some trouble later on by doing this!
Tuesday, 8 December 2015
Solvents
I think by now, most of us have a basic understanding about how some liquids can and cannot mix together
Like Oil and Water or Oil and Vinegar
![]() | ||||
| Except in my tummy.....YUM! |
This is mainly due to PH balance. But I could be wrong, because I don't have a "PhD" :)
For finishers, understanding which materials can be mixed together can seem puzzling and overwhelming. Categorizing these solvents can help simplify this mad science.
Below I have reduced the most popular solvents or "Vehicles" and finishes into four catagories.
Generally this means when going down the Lacquer road, don't mix it with Mineral Spirits or bad things will happen.
| 4 most common finishes and their Vehicles. |
Solvents dissolve particles which are "soluble" to them
In finishing we sometimes call this a vehicle because it transports the solid particles onto the surface before evaporating, and ultimately leaving the particles to create a coating.
Of course there are more variables to this Chemistry labyrinth than four
Instead of Breaking Bad, take a look at Bob Flexner's graphs
"You can usually recognize a solvent by its suffix. Alcohols, which
dissolve and thin shellac, have the suffix -ol. Ketones, which dissolve
and thin lacquers, have the suffix -one. Esters, which dissolve and thin
lacquers, have the suffix -ate (methyl acetate, amyl acetate, etc.).
Glycol ethers, which dissolve water-based finishes and dissolve and thin
lacquers, end in “ether." .- Bob Flexner
Here are the links to Bob Flexner's articles on Sovents
Flexner Solvents1 Flexner Solvents2
Oily Rags
Oily rags can easily spontaneously combust
They are responsible for most fires in both home and commercial cabinetry shops
Rags left on the workbench during break time for 10 minutes are dangerous.
In our shop we are lucky to have great big windows for natural light.
The heat however from the sun can accelerate this process. I have witnessed it myself.
The key to fire prevention is proper handling and disposal of oily rags.
Below is a rag canister in which to discard old and used rags
Wetting the rag before disposal will slow down possible combustion time
Policy
- Rags are not to be left around the shop and must be immediately disposed.
- All rags are to be thrown into the canister, not the garbage (if not sure about the solvent assume it is oil!)
- At the end of the day
- The canister will be emptied into a garbage bag
- The bag will be filled with enough water to saturate the rags
- The bag will be carried to the dumpster outside the building.
- A schedule will be posted in class naming 2 students responsible for rag disposal each day
Monday, 7 December 2015
Health and Safety
Module 21 is a finishing Module.
During this module strict health and safety rules will be enforced.
Students who do not comply will not be permitted to attend class.
This means PPE's are mandatory throughout the entire Module.
- Gloves are supplied by the school and are available at the tool crib
- Dust Masks are supplied by the school and are available at the tool crib
- Disposable ear plugs are supplied and available next to the office
Students must have
- Steel Toe shoes
- Organic Vapour Mask
These Vapour masks can be bought at any hardware store. Unless otherwise specified on the packaging, the disposable filters should be the right ones (carbon).
An apron is recommended or clothing which you expect to be "stained"
To review Hazardous material lessons click on the link below
Identifying Hazmats / WHMIS
To review Hazardous material lessons click on the link below
Identifying Hazmats / WHMIS
Complete the WHMIS assignment
Subscribe to:
Posts (Atom)